Connect to a Headless CrashPlan Desktop
Overview
A headless CrashPlan Desktop means that CrashPlan is running on a machine without a graphical environment (headless mode), like a Linux or Solaris server. You do not have to do anything to run in “headless mode.” The PRO Client service is running once you install the DFW DataVault Client.
This article describes how to connect a CrashPlan Desktop to a CrashPlan engine running on a remote computer.
Running a headless CrashPlan Desktop is a also great way to remotely administer CrashPlan that is running as a backup destination.
CrashPlan is comprised of two components:
- CrashPlan engine: This always running from the moment you install CrashPlan and continues to run even if you log out. It is responsible for the actual backup functions.
- CrashPlan Desktop: This runs as a desktop application that you can launch from a user's desktop. This is what most people mean when they refer to “CrashPlan.” Headless means you do not open CrashPlan Desktop.
Before You Begin
- Have a good understanding of networking, TCP/IP
- Feel comfortable using a command line terminal
- Be familiar with SSH
How It Works - Using SSH
Use an SSH tunnel to connect the CrashPlan Desktop on one machine (1.1.1.1) to the CrashPlan Engine on a computer that is text-only (2.2.2.2).
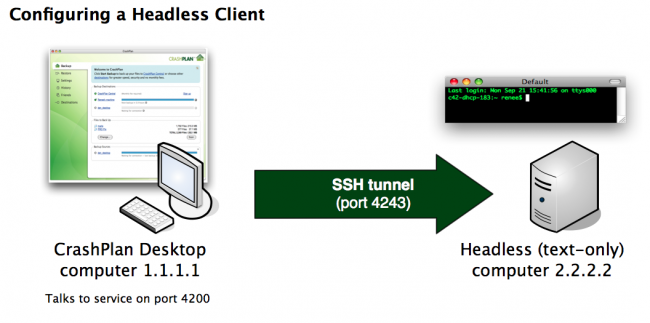
- Install and start engine on the text-only server (2.2.2.2).
- Install CrashPlan on CrashPlan Desktop computer (1.1.1.1).
Use Mac, Windows, Linux. It doesn't matter which platform you use. - Close the CrashPlan Desktop if it's running.
- On 1.1.1.1, navigate to CrashPlan\conf on 1.1.1.1.
- Open file ui.properties in a text editor.
- Edit the line:
#servicePort=4243
to this:
servicePort=4200
- Open a terminal window on 1.1.1.1.
- Using SSH, forward port 4200 on 1.1.1.1 to port 4243 on 2.2.2.2.
The command is:
ssh -L 4200:localhost:4243 yourusername@2.2.2.2
- On 1.1.1.1, open the CrashPlan Desktop.
Your CrashPlan Desktop is now connected to the CrashPlan Engine on 2.2.2.2. You can now configure CrashPlan on 2.2.2.2.
How It Works - Switch Your CrashPlan Desktop Back
When you're done using the CrashPlan Desktop on the text-only computer, switch your CrashPlan Desktop back.
- On 1.1.1.1, open the ui.properties file in a text editor.
- Comment out the servicePort line.
#servicePort=4200
- Save your changes.
How It Works - Using PuTTY
Putty is a free Windows SSH client that you can use to do the port-forwarding necessary to control a remote CrashPlan client.
Before we get started:
- Be sure CrashPlan is running on your remote machine.
- Verify on the headless machine (with netstat) that it is listening on port 4242 on all addresses and on port 4243 on the local address (This is the UI service port).
netstat -na | grep LISTEN | grep 42
Output should look like this:
username$ netstat -na | grep LISTEN | grep 42
tcp4       0      0  *.4242                 *.*                    LISTEN
tcp4       0      0  127.0.0.1.4243         *.*                    LISTEN
We want to use SSH to tunnel a local Windows port (4200) to the remote host's service port (4243).
- Enter the IP for SSH as you normally would, but don't open the connection yet.

- In the Connection > SSH > Tunnels section, add the following:

- Now open the session and log in.
- You can use telnet to confirm the connection:
telnet localhost 4200
A successful connection displays “Connected to HOST_IP” with a long, encrypted string. It looks something like this:
username$ telnet 10.10.42.183 4200
Trying 10.10.42.183...
Connected to 10.10.42.183.
Escape character is '^]'.
0??A???A8???Tţ?pm??.R??JM???AZ?1?jB?????١??ɀAIcKeyMessageY??0??0??      *?H??
                                              nz^@~?Y?Wq#@AE????7r???k!.?^\??$?]?[{??!'?!~>]}????b??ʣ?J&H;????"0?`PC@G~??? ???k[??B[??=b#?_?#x)H?j?~Hwv???????]{??%8?kT?c?A?
Once you have confirmed the connection you should be able to stop the local CrashPlan Desktop application, make sure the servicePort is 4200 in the conf/ui.properties file and restart the Desktop UI.
Consideration
If you run a headless client, you will have to manually upgrade.