Restoring Your Files
Overview
Being able to restore is the reason you back up your files in the first
place. When you lose a file, you can get that file back (restore it)
because a copy of the file has been saved somewhere else. Restore the
file and you're back in business.
Because the DFW DataVault software verifies the recoverability of the files in your
backup archive, you can be confident your files will work when you
restore them.
Backing up to multiple locations means that you have several options for restoring files. Most of the time, you'll be restoring files from your desktop or from another computer in your DFW DataVault account. If you don't have access to any of your computers, you can use the Guest Restore feature from a computer to which you have been backing up (for example, a friend's computer).You can go to your DFW DataVault account online and use Web Restore.
Before You Begin
- You need to have backed up the file to restore it.
How It Works - Restoring Files at Your Desktop
When you’re at the office, restore files you need from any other computer that’s running the DFW DataVault software (for example, a computer at home) to your desktop or laptop. The computer you want to restore from needs to be turned on before you can restore from it.
- Click the Restore tab.
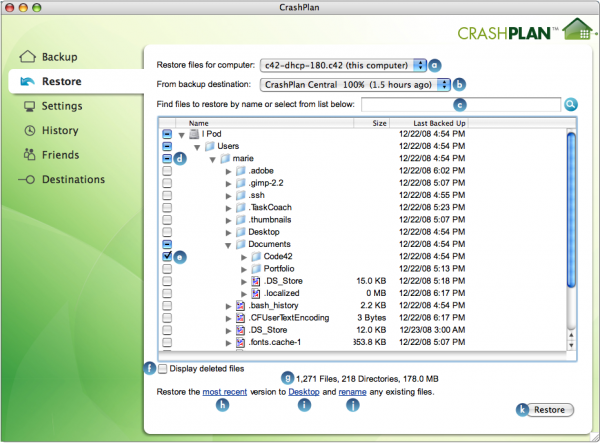
- Choose the computer from which the file was backed up.
All the computers you are backing up will be listed. - From the Backup destination list, choose the computer from which you want to restore.
If you have a subscription to DFW DataVault, it will be listed in the Backup destination list. - Click an empty box to restore that folder/file.
- If there are multiple versions of the file you want to restore, click the Most Recent link.
- Choose the date and time of the file you want restored.
- Click Ok.
- (optional) Click the Desktop link if you want to change the location where the restored file should go.
Clicking the link cycles through your restore location options. You can send restored files to your desktop, to their original location on your computer or to another folder that you choose - in which case, click the default restore location (e.g., Desktop) to select a new location. - (optional) Click the Replace link, if you don’t want the restore files to overwrite the existing file. When you click the link the setting changes to Rename.
- Click Restore.
Tip: You can use the “Find files to restore…” box to search for a particular file. If you aren’t sure of the exact file name, you can enter a portion the file name.
How It Works - Guest Restore
Use Guest Restore to restore files while sitting at your friend's computer. In order to use Guest Restore, your files must be backed up to the computer you're sitting at.
To perform a guest restore at a friend's computer:
- Click the Friends tab.
- Click Guest Restore.
- Enter your account password (or private data password, if enabled).
- Choose the computer from which the file was backed up.
All the computers you are backing up will be listed. - From the Backup destination list, choose the computer from which you want to restore.
If you have a subscription to DFW DataVault, it will be listed in the Backup destination list. - In the “Find files to restore…” box enter the file name to restore.
If you aren’t sure of the exact file name, enter the first few characters of the file name. - Click an empty box to restore that folder/file.
- If there are multiple versions of the file you want to restore, click the Most Recent link.
- Choose the date and time of the file you want restored.
- Click Ok.
- (optional) Click the Desktop link if you want to change the location where the restored file should go.
Clicking the link cycles through your restore location options. You can send restored files to your desktop, to their original location on your computer or to another folder that you choose - in which case, click the default restore location (e.g., Desktop) to select a new location. - (optional) Click the Replace link, if you don’t want the restore files to overwrite the existing file. When you click the link the setting changes to Rename.
- Click Restore.
Rename or Replace Existing Files?
- Rename option: the DFW DataVault software will automatically rename your the original file. For example, you restore a file called cat.doc to your desktop. If you already have a file with that name on your desktop, the original file (the existing file) will be renamed to original.cat.doc and the restored file will be saved as cat.doc.
- Replace (overwrite) option: The original file is replaced (overwritten). For example, cat.doc will be replaced by the restored version of that document. Use the Replace (overwritten) option when your files have been corrupted or infected with a virus. Be sure to close any programs that might still have those files open (Word, for example) before you start restoring.
- If you are not sure whether you want to rename or replace, choose the Rename option. You can always delete duplicate files later.
- After you click the Restore button, you can view the status of your Restore process.
How It Works - Web Restore
Web restore allows you to restore files stored on DFW DataVault using a web browser. Web Restore is designed to be a “quick fix” for restoring a few files when you need them and is not designed for very large restores.
- Open a web browser.
- Go to DFW DataVault.
- In the Restore Data column, click the restore link next to the source computer you'd like to restore files for.
- Select your files or folders from the file tree. Note: Web Restore has a 250 MB limit per restore.
- Click restore.